Efficiency, uptime, and the minimizing of costs are three of the most important pillars of a successful industrial operation. Understanding the operating state of equipment, overall efficiency of a piece of equipment, or a whole production line – as well as how these affect costs and revenue across multiple sites – requires a complete view of your operational data.
AWS IoT SiteWise is a managed service providing the ability to collect, organize, and analyze industrial equipment data from edge to cloud. AWS SiteWise Edge is the edge component for reading data from industrial protocols, publishing to AWS IoT SiteWise in the cloud, storing and forwarding data in cases of disconnection with the cloud, and calculating transforms and metrics at the edge by using the optional data processing pack.
AWS IoT Greengrass is a managed open source edge runtime and cloud service used as the foundation layer for AWS IoT SiteWise Edge enabled devices. MQTT (MQ Telemetry Transport) is a commonly used industrial communication protocol that follows the pub-sub pattern. MQTT clients like Paho python client or AWS IoT MQTT clients send messages and/or subscribe to topics to receive messages from MQTT servers (also called brokers). These servers in turn manage the connections, relaying of data, and subscriptions of the different clients.
Data flow between MQTT clients and the AWS IoT SiteWise service is enabled through use of an AWS IoT Greengrass connector. You can use this capability to integrate your industrial connectivity middleware and secondary sensors with AWS IoT SiteWise Edge to process data locally and then route it to the cloud.
In this post we provide an overview of how to configure and use the custom-built AWS IoT SiteWise MQTT connector on the Greengrass v2 edge runtime service to enable data flow and processing from equipment from the edge to the cloud.
Solution overview
The solution deployed in this blog post will complete the following steps in your AWS account:
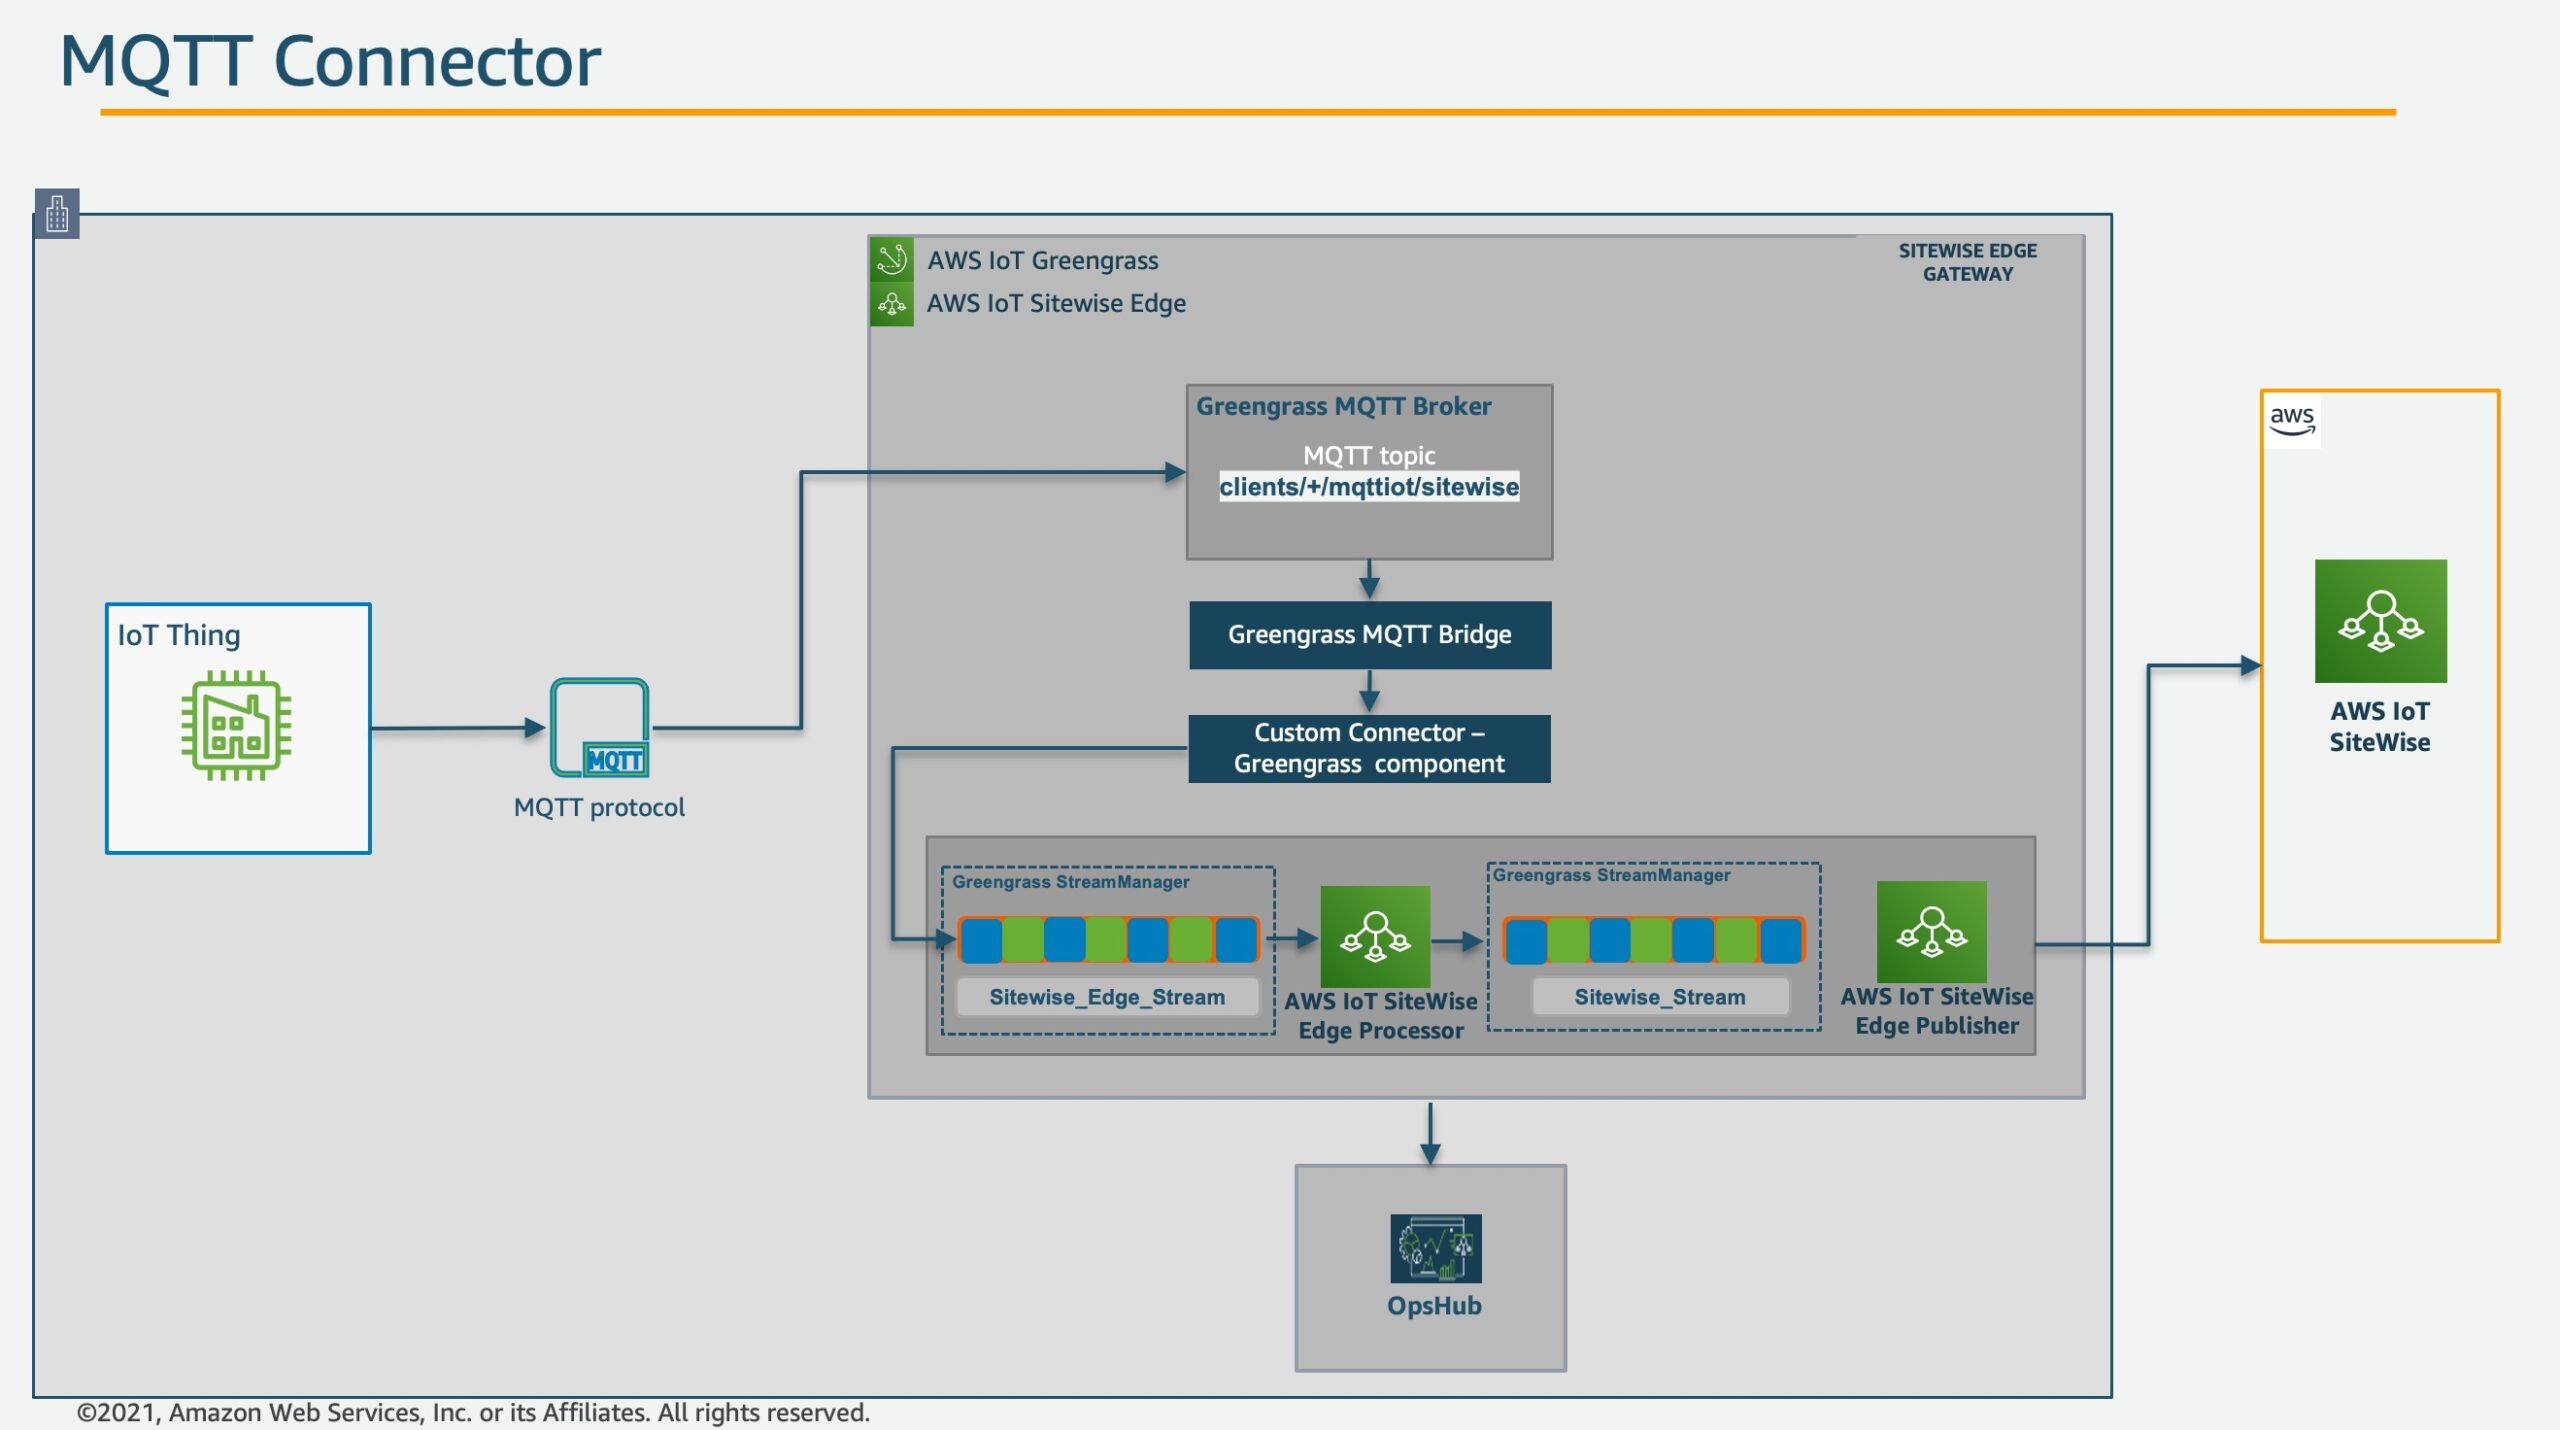
Figure 1 following illustrates the deployed solution.
Architecture 1
Prerequisites and assumptions
To follow the steps outlined in this blog post, you need the following:
An AWS account that provides access to AWS services.
AWS CDK Toolkit (cdk command) setup on your local computer to setup the AWS IoT SiteWise asset models and assets. For more information on how to setup, check here.
The templates and code are intended to work in the US East-1 (N. Virginia) Region only.
Step 1: Create sample AWS IoT SiteWise asset models and assets in your AWS account
In this step, we will setup the AWS IoT SiteWise asset models and assets. To do so, we will use an AWS CDK script that will generate asset models and assets in your AWS IoT SiteWise console.
You can use these downloadable scripts to setup the assets and asset models. Once you download this repo onto your local computer/mac, run the below commands.
Note: Make sure you installed aws_cdk in your python environment before running the below commands. Otherwise, you will get “No module named ‘aws_cdk’.
git clone [email protected]:aws-samples/sitewise-mqtt-custom-connector.git
cd <Downloaded location>
cd sitewise-mqtt-custom-connector/sitewise-assets-creation/
cdk bootstrap aws://<YOUR_AWS_ACCOUNT_NUMBER>/<AWS_REGION> –profile <AWS_CLI_PROFILE_NAME>
cdk deploy sitewise-assets-creation –profile <AWS_CLI_PROFILE_NAME>
Once the above CDK script execution is completed, it will create two AWS IoT SiteWise asset models named 1) generator-model and 2) hvac-model. You can check these models by logging into the AWS IoT SiteWise console in your AWS account.
This script also creates 100 assets of each model. You can check these assets by logging into AWS IoT SiteWise console and navigating into the “Assets” section.
Step 2: Setup AWS IoT SiteWise gateways
AWS IoT SiteWise gateways serve as the intermediary between your clients like Paho python client and AWS IoT SiteWise. It runs on AWS IoT Greengrass V2 and supports data collection and processing on premises. To install gateway software, the device must meet the requirements that are specified in this AWS documentation. Creating and configuring an AWS IoT SiteWise gateway has two steps. The first one is to configure gateway in the AWS IoT SiteWise console and the second step is run the installation script on the actual gateway device.
a) Create and configure a gateway:
To configure a gateway, navigate to the AWS IoT SiteWise console. In the navigation page, choose Gateways and click on create gateway button. Enter a name for Gateway or choose the generated name and select “Default setup” for Greengrass core device. You can choose the generated name for Core device name or provide a name to core device. After providing the values, click on the Next button.
In the Configure edge capabilities page, select Data processing pack to enable the gateway device to process the data the edge. The data collection pack is enabled by default. Do not select the Edge LDAP configuration. Click on the Next button.
In the Add data sources page, click on the Next button.
In the Review and generate an installer page, select ubuntu operating system under Gateway device OS. Click on the Generate button and click on the Acknowledge button.
You will be prompted to save the installation script on your local mac or Windows machine (e.g., Laptop, desktop). Save the script file in a known location. We need to copy the installation script to your gateway device in the next step.
b) Execute the installation script on your AWS IoT SiteWise gateway device:
For demonstration purpose, we will use an Amazon EC2 instance as our AWS IoT SiteWise gateway device. In your AWS web console, go to the Amazon EC2 section and create an Amazon EC2 instance. For this demo, we have selected m5.xlarge instance type with Ubuntu 18.04 as the operating system. The recommended disk space for the AWS IoT SiteWise gateway device is at least 256 GB.
Make sure you have Python3.7 and pip3 installed on your local machine. > sudo apt update && sudo apt install software-properties-common && sudo add-apt-repository ppa:deadsnakes/ppa
> sudo apt install python3.7
> sudo update-alternatives –install /usr/bin/python python3 /usr/bin/python3.7 1
> sudo update-alternatives –install /usr/bin/python python3 /usr/bin/python3.6 2
> sudo update-alternatives –config python3
Choose the selection number that uses python 3.7.
> sudo rm /usr/bin/python3 && sudo ln -s /usr/bin/python3.7 /usr/bin/python3
> sudo apt-get install python3-pip
Copy the installation script that was generated by the SiteWise gateway to run on Amazon EC2 instance (your gateway device). Once the script is copied, provide execute permission to it and run the installer.
> chmod +x path-to-installer.sh
> sudo ./path-to-installer.sh
It will prompt you if any of the dependencies are missing. When prompted, select “yes” with the installation. This script will install the necessary dependencies, setup the Greengrass software and configures the AWS IoT SiteWise gateway.
Once the installer runs successfully, login to AWS IoT Console and go to Core devices. You will see your Greengrass core device in Healthy status.
Step 3: Configure asset models for the edge
Follow the below steps to configure an asset model for the edge. Our asset models creation script in Step 1 created two asset models for you with the names: a) generator-model and b) hvac-model.
Navigate to the AWS IoT Sitewise console.
Choose Models in the Build section. You will see “generator-model” and “hvac-model”. We will enable asset models for both of these models.
First select “generator-model” and click on “Configure for edge” button.
Under “Choose the edge configuration for this asset model”, select “No edge configuration” option. Since we do not have any metrics or transformations defined for our asset models, nothing will be computed at the edge. If you have metrics or transformations that needs to be computed at the edge, select either “Compute all properties at the edge” or “Custom edge configurations” options.
Since we did not configure any “metrics” or “transformations” for this asset models, nothing will show up under the “Configure metrics” and “Configure transforms” section.
Under the “Configure measurements” section, by default the options will be grayed. These measurements will be sent to cloud as well.
Click on Save button.Repeat the same above steps for the “hvac-model” as well.
Step 4: Provision a publisher device to publish the messages to the AWS IoT Greengrass MQTT broker
As per the architecture diagram shown previously, we will assume that an external device (publisher) will be publishing the MQTT messages to an AWS IoT Greengrass core device’s MQTT broker. The external device needs to use cloud discovery to find the AWS IoT Greengrass core and we need to configure the publisher’s MQTT client to talk to AWS IoT Greengrass core.
In this blog post, let’s use another Amazon EC2 instance as our publishing device. Launch a second Amazon EC2 instance as described in this document. I have selected t3.large instance type with Ubuntu 18.04 as the operating system.
Let’s register the publisher device and configure the certificates and keys to allow it to connect to AWS IoT Greengrass.
In the AWS IoT Console, choose Manage, and click on Things.
Click on the Create things button.
Select Create single thing option and click on Next.
In the Specify thing properties page, provide a name to Thing name. Here in this case, I am using: Publisher_Device_SWGateway.
Note: We will use this device name “Publisher_Device_SWGateway” in the below steps. Recommend to use the same name for the purposes of this demo.
In the Device Shadow section, select No shadow option and click on Next button.
On the Configure device certificate page, choose Auto-generate a new certificate.
On the Attach policies to certificate page, choose the AWS IoT policy to review and update. You can use the same IoT Policy that was attached to the Core device or you can create new policy with the below policy document. {
“Version”: “2012-10-17”,
“Statement”: [
{
“Effect”: “Allow”,
“Action”: [
“iot:Connect”,
“iot:Publish”,
“iot:Subscribe”,
“iot:Receive”,
“greengrass:*”
],
“Resource”: “*”
},
{
“Effect”: “Allow”,
“Action”: [
“iot:GetThingShadow”,
“iot:UpdateThingShadow”,
“iot:DeleteThingShadow”
],
“Resource”: [
“arn:aws:iot:region:account-id:thing/*”
]
}
]
}
In this case, select the same IoT policy that was used by the Greengrass core device. Click on “Create thing” button.
On the “Download certificates and keys” page, click on the Download buttons to download Device certificate, Public key file, Private key file and Amazon Root CA 1 certificates and click on Done button.
Once you download these files on to your local machine, copy the files to your publisher device (the Amazon EC2 instance that was created at the beginning of the Step 4). > cd <Downloaded location>
> scp -r -p -i <pem-file-location.pem> <hash>-certificate.pem.crt [email protected]:/tmp/
> scp -r -p -i <pem-file-location.pem> <hash>-private.pem.key [email protected]:/tmp/
> scp -r -p -i <pem-file-location.pem> <hash>-public.pem.key [email protected]:/tmp/
> scp -r -p -i <pem-file-location.pem> AmazonRootCA1.pem [email protected]:/tmp/
On the Amazon EC2 instance, create the below directory and copy the certificate files into that location. > mkdir -p ~/iot-certs/
> cd /tmp
> cp -r -p /tmp/<hash>-* ~/iot-certs/
> cp -r -p /tmp/AmazonRootCA1.pem ~/iot-certs/
Enable client device support
To enable a client/publisher device to connect to an AWS IoT Greengrass core device, the client device needs to retrieve the core device’s IP addresses and certificates. Follow the steps described here to enable the client device support.
Note: For “aws.greengrass.clientdevices.Auth” component, use the below “Configuration to merge”.
{
“deviceGroups”:{
“formatVersion”:”2021-03-05″,
“definitions”:{
“MyDeviceGroup”:{
“selectionRule”:”thingName: Publisher_Device_SWGateway*”,
“policyName”:”MyClientDevicePolicy”
}
},
“policies”:{
“MyClientDevicePolicy”:{
“AllowConnect”:{
“statementDescription”:”Allow client devices to connect.”,
“operations”:[
“mqtt:connect”
],
“resources”:[
“*”
]
},
“AllowPublish”:{
“statementDescription”:”Allow client devices to publish to all topics.”,
“operations”:[
“mqtt:publish”
],
“resources”:[
“*”
]
},
“AllowSubscribe”:{
“statementDescription”:”Allow client devices to subscribe to all topics.”,
“operations”:[
“mqtt:subscribe”
],
“resources”:[
“*”
]
}
}
}
}
}
Make sure you provide the correct thingname. This blog uses “Publisher_Device_SWGateway” as device thing name. Use “*” for the wild card pattern at the end of the thingName.
For “aws.greengrass.clientdevices.mqtt.Bridge” component, use the below “Configuration to merge”. Make sure the topic name is “clients/+/mqttiot/sitewise”.
{
“mqttTopicMapping”:{
“SiteWiseMQTTIotCoreMapping”:{
“topic”:”clients/+/mqttiot/sitewise”,
“source”:”LocalMqtt”,
“target”:”IotCore”
},
“localGGPubsubMapping”:{
“topic”:”clients/+/mqttiot/sitewise”,
“source”:”LocalMqtt”,
“target”:”Pubsub”
}
}
}
Install the AWS IOT SDK v2 for Python on the publisher device and get the basicDiscovery.py sample function to get the Greengrass Group CA.
Make sure you have Python3.7 and pip3 installed on your machine. > sudo apt update && sudo apt install software-properties-common && sudo add-apt-repository ppa:deadsnakes/ppa
> sudo apt install python3.7
> sudo update-alternatives –install /usr/bin/python python3 /usr/bin/python3.7 1
> sudo update-alternatives –install /usr/bin/python python3 /usr/bin/python3.6 2
> sudo update-alternatives –config python3
Choose the selection number that uses python 3.7.
> sudo rm /usr/bin/python3 && sudo ln -s /usr/bin/python3.7 /usr/bin/python3
> sudo apt-get install python3-pip
Download the AWS IoT Device SDK v2 for Python to an appropriate location on your computer. > Login as root(sudo) user on the Publisher EC2 instance.
> sudo su –
> cd ~
> git clone https://github.com/aws/aws-iot-device-sdk-python-v2.git
> python3 -m pip install ./aws-iot-device-sdk-python-v2
Step 5: Create an AWS IoT Greengrass component that collects the data stream from Greengrass core’s MQTT broker and sends to AWS IoT Sitewise Edge
Once the data from industrial equipment sensors are ingested through MQTT client into the AWS IoT Greengrass MQTT broker, the custom AWS IoT Greengrass component writes the data to AWS IoT Greengrass stream SiteWise_Edge_Stream. The AWS IoT SiteWise edge processor continuously pulls data out of SiteWise_Edge_Stream and processes it. This service also writes this data to an AWS IoT Greengrass stream named SiteWise_Stream depending the configuration setting. The AWS IoT SiteWise publisher component continuously reads the data out of SiteWise_Stream and sends that data to AWS IoT SiteWise service in the cloud.
Let’s setup and deploy the AWS IoT Greengrass component that collects the messages from the AWS IoT Greengrass MQTT broker and sends to AWS IoT Sitewise in the cloud.
The code for the component can be found here.
Download the git repo code on to your local mac or windows machine. Make sure AWS CLI is setup and configured with your AWS account credentials so that you can run the “aws” commands from the terminal/command prompt.
Run the below steps on your mac/pc. The ddeploy-mqtt-connector.sh script will create an artifact compressed file, create an Amazon S3 bucket with prefix “ggv2-mqtt-to-sitewise-component-” in your AWS account to store the artifacts, and prepare the deployment configuration file and the recipe files. Finally, it will deploy the component to your AWS IoT Greengrass core device.This script takes two arguments.
First argument is your IoT Core name where your AWS IoT SiteWise gateway is running.
Second argument is your AWS Account number. > cd ~
> git clone [email protected]:aws-samples/sitewise-mqtt-custom-connector.git
> cd sitewise-mqtt-custom-connector/mqtt-to-sitewise-connector-component/ Export AWS Credentials > export AWS_ACCESS_KEY_ID=”XXXXXXXXXXXXXXXXXXX”
> export AWS_SECRET_ACCESS_KEY=”XXXXXXXXXXXXXXXXXXXXXXXXXXXXXXXX”
Run “ddeploy-mqtt-connector.sh” script. > bash ./ddeploy-mqtt-connector.sh <IOT_CORE_NAME> <AWS_ACCOUNT_NUMBER>
Once the deployment is successful, you can login to the AWS IoT Greengrass core device and can check the component log files. > sudo su –
> cd /greengrass/v2/logs
> tail -f community.greengrass.MqttToSitewise.log
You will see the below messages in the log file.
2021-08-25T20:28:50.793Z [INFO] (Copier) community.greengrass.MqttToSitewise: stdout. 2021-08-25 20:28:50,793 – dev – INFO – Total processed messages were : 0. {scriptName=services.community.greengrass.MqttToSitewise.lifecycle.Run, serviceName=community.greengrass.MqttToSitewise, currentState=RUNNING}
Step 6: Configure the gateway credentials
To access the data or dashboards from the gateway, you need to access the gateway as described in this AWS documentation. In this blog post, we will use Linux credentials to access the gateway.
Run the below commands on the AWS IoT SiteWise gateway device. Here, we are creating a Linux user with the name “sweops1”.
> sudo groupadd –system SWE_ADMIN_GROUP
> sudo useradd sweops1
> sudo passwd sweops1
Supply the password
> sudo usermod -a -G SWE_ADMIN_GROUP sweops1
Step 7: Monitor AWS IoT SiteWise data at the edge.
To access the AWS IoT SiteWise Monitor at the edge, we will download and install the “OpsHub for AWS IoT Sitewise Application” on a Windows-based EC2 instance. In your AWS web console, go to the EC2 section and create an Amazon EC2 instance. For this demo, I have selected “Microsoft Windows Server 2019 Base” AMI with an m5.xlarge instance type.
Once the Windows EC2 instance is created, use Remote Desktop Protocol (RDP) program to connect to the Amazon Windows EC2 instance. Download and install OpsHub for AWS IoT Sitewise Application on this Amazon Windows EC2 instance.
Note: Make sure port 443 and 8443 ports are open to the Sitewise Gateway EC2 instance.
Once you open the OpsHub for AWS IoT Sitewise, it will show the below screen. This is your local gateway application.
Provide “IP address/Host name” of the Gateway device/Greengrass core device. You can get the IP address of the gateway device by running the “hostname -i” command.
Select Linux as Authentication method.
Provide User name that was created above. In this case we have created the user “sewops1”.
Provide password for the user.
Select Sign In.
Once you connect to the OpsHub, you will see the following dashboard.
Step 8: Run the test data simulator program to push data into the AWS IoT Greengrass V2 MQTT broker from the publisher host
Download a test data generator that will generate random values for the assets that were created in Step 1. It also sends the generated values to a topic (clients/+/mqttiot/sitewise) in the AWS IoT Greengrass MQTT broker that comes with Greengrass version 2.
Login to the second EC2 instance (publisher) that was created at the beginning of Step 4 and clone the repository and run the below commands.> cd ~ > git clone [email protected]:aws-samples/sitewise-mqtt-custom-connector.git
> cd sitewise-mqtt-custom-connector/mqtt-client-test/
> cd config/
Note: Change the values in conf.cfg file with your certs files that we copied in the ~/iot-certs folder.
Change the below values in the conf.cfg file.
Numer
Property
Change to
1
CERTS_PATH
This the cert file’s location that you have created. If you follow the instructions in the blog the value will be /home/ubuntu/iot-certs
2
host
This will be your Greengrass core device host IP address. In this case, you can get the IP address of the Greengrass core device by logging into the 1st EC2 instance that was created in Step 2.
Run the command: hostname -i to get the IP address of your Greengrass core device.
3
root_ca_file
This will be your root ca file. In our case it is AmazonRootCA1.pem. Make sure you have named the root ca file with this name, otherwise change this value as needed.o
4
certificate_file
This will be your thing’s/device’s certificate file. Replace the with your cert’s hash value. This is also in your ~/iot-certs folder. The value will be: hash-certificate.pem.crt
5
privatekey_file
This will be your thing’s/device’s private key file. Replace the with your cert’s hash value. This is also in your ~/iot-certs folder. The value will be: hash-private.pem.key
6
thingName
This will be your publisher device’s thing name. In this case, our thing name is: Publisher_Device_SWGateway.
7
topic
This will be the topic name that you have set during the Enable Client device support in Step #3. In our case it was set to “clients/+/mqttiot/sitewise”. So you can replace “+” with “any value”. In this case, we will use: “clients/dev1/mqttiot/sitewise”.
8
Region
By default, this blog assumes all the previous assets were created in us-east-1 region. So the value will be “us-east-1”.
Execute the test data generator program so that it will generate some data set and will send to the Greengrass MQTT broker. After updating the configuration values in the previous step, run the below commands.Make sure, the publisher/client device and AWS IoT Greengrass core device are in the same network. The publisher/client device needs to connect to Greengrass core device on port number 8883. If your client and Greengrass core devices are EC2 instances, then allow port 8883 in security groups. > cd ~/sitewise-mqtt/mqtt-client-test
> chmod -R 755 TestDataGenerator.py
> python3 TestDataGenerator.py
This will start publishing the messages. When you want to stop generating the data, just press “ctrl+c” to exit out of the program.
Once data is flowing through AWS IoT Sitewise Edge, we can visualize it using AWS OpsHub for AWS IoT SiteWise for Windows
Step 9: Verify the data is populating in the OpsHub gateway client
In the OpsHub tool, click on the “Assets” tab, and select “SiteWise assets.” Select one of the assets and go to the “Measurements” tab. You should see the values getting populated under the “Latest value” column.
Step 10: Verify the data is transmitting to AWS IoT SiteWise in the cloud
We can also verify if the data is populating to AWS IoT SiteWise in the cloud. Once the data is populated to AWS IoT SiteWise Edge, it will also be populated to AWS IoT SiteWise in the cloud.
Go to the AWS IoT SiteWise console and see if the data is getting populated. Go to Assets, then select one of the assets where the data got populated from the above test data generator. Go to Measurements and you should see values under Latest value column.
Cleanup
After completing and testing the solution, follow the instructions below to clean up the AWS resources you create.
Delete AWS IoT SiteWise Gateway
Login to AWS console, go to AWS IoT SiteWise service, select the Gateway that was created and click on Delete button.
Clean up the AWS resources created by CDK. > cd sitewise-mqtt-custom-connector/sitewise-assets-creation/
> cdk destroy sitewise-assets-creation –profile <AWS_CLI_PROFILE_NAME>
From the AWS EC2 console page, delete the following EC2 instances that were created during the above setup.
AWS IoT SiteWise gateway Amazon EC2 instance.
Publisher Amazon EC2 instance that was used to publish test messages.
Amazon EC2 instance (Microsoft Windows AMI) used to access the AWS IoT SiteWise Monitor at the edge.
AWS IoT Greengrass core device: Go to AWS IoT Core console, and select Greengrass. Under that select Core devices, and select the core device that was created and click on Delete button.
Conclusion
In this post, we described how to create a custom connector to deliver IoT device message payloads to AWS IoT SiteWise Edge through AWS IoT Greengrass’s stream manager. We went through provisioning a publisher device to publish MQTT messages to the MQTT broker that comes with AWS IoT Greengrass. We also demonstrated the usage of the MQTT bridge component to subscribe to MQTT broker and deliver messages to downstream custom components. You can learn more on interacting with local IoT devices in this documentation.
About the Authors
Srikanth Kodali
Srikanth Kodali is a Prinicipal IOT Data analytics architect at Amazon Web Services. He works with AWS customers to provide guidance and technical assistance on building IoT data and analytics solutions, helping them improve the value of their solutions when using AWS.
Kurt Mueller
Kurt Mueller is a Senior Technical Product Manager in AWS IoT focused on getting industrial customers the products they need. He is focused on liberating equipment and sensor data, transforming it into actionable insights that customers can use to optimize, augment and reinvent their industrial production processes.
Lomash Kumar
Lomash Kumar is a Principal Engineer in AWS IoT helping industrial customers get the most out of their manufacturing operations. He helps customers realize hybrid solutions that benefit from both the cloud and the edge offerings from AWS.


Leave a Reply
You must be logged in to post a comment.