
On Mar 1, 2022, we announced AWS IoT Application Kit, an open-source UI components library for IoT application developers. With AWS IoT Application Kit, developers can build rich interactive web applications leveraging data from AWS IoT SiteWise. IoT application developers can deliver customized user experiences like industrial asset monitoring applications using web front-end frameworks like ReactJS, Vue.js or vanilla JavaScript along with reusable components from AWS IoT Application Kit.
What is AWS IoT Application Kit?
AWS IoT Application Kit is an open-source, client-side library that enables IoT application developers to simplify the development of complex IoT applications. It leverages performant, reusable components that abstract critical technical considerations expected from a real-time web application; for example, handling streaming data, caching, preloading data, dynamic aggregation, and preventing request fragmentation. This abstraction allows IoT application developers to focus on building custom user experiences and worry less about underlying technical complexities.
In cases where customers require integrating and enriching their existing web applications for visualizing IoT data from AWS IoT SiteWise, AWS IoT Application Kit also allows customers to integrate the included components into their existing web application.
Getting started with AWS IoT Application Kit
AWS IoT Application Kit is currently available as a npm package – @iot-app-kit/components. You can install this package with:
Using npm
npm install @iot-app-kit/components
For additional details, please refer to the technical documentation for AWS IoT Application Kit.
Building with AWS IoT Application Kit
In this blog post, we’ll build a ReactJS web application with AWS IoT Application Kit and AWS IoT SiteWise for monitoring an industrial juice bottling line, displaying the telemetry (such as Machine Status and Production Count) from each of the constituent machines in the bottling line.
Walkthrough
Prerequisites
The following is required to build this solution:
AWS CLI
AWS CDK
An AWS CLI profile with permissions to deploy stacks via AWS CloudFormation
A default VPC present in your AWS account
Step 1: Simulate telemetry of an industrial bottling line
The industrial juice bottling line we want to model is comprised of the following interconnected machines (in order):
Table 1: Ordered list of interconnected machines in simulated industrial juice bottling line
Order
Machine Name
Machine ID
Description
1st
Washing Machine
UN01
Washes, sanitizes and dries each incoming empty bottle.
2nd
Filling Machine
UN02
Fills each incoming sanitized bottle to the configured quantity.
3rd
Capping Machine
UN03
Caps and seals each incoming filled bottle.
4th
Labelling Machine
UN04
Attaches and prints the product label on each capped bottle.
5th
Case Packing Machine
UN05
Packs configured group of labelled bottles into a single case.
6th
Palletizing Machine
UN06
Palletizes multiple cases of processed bottles into a pallet for shipment.
Each of these machines emits the following data measurements as telemetry:
Table 2: List of modeled OPC-UA tags
Measurement Name
Measurement Unit
Data Type
Modeled Tag
Description
Machine State
None
Integer
{Machine_ID}/Status/StateCurrent
Current operational state of the machine. Possible values are listed in Table 3: Machine States Description.
Machine Mode
None
Integer
{Machine_ID}/Status/ModeCurrent
The mode under which the machine is operating. Possible values are listed in Table 4: Machine Operating Modes.
Current Speed
Bottles per minute
Double
{Machine_ID}/Status/CurMachSpeed
Current operational speed of the machine measured in bottles processed per minute.
Blocked
None
Boolean
{Machine_ID}/Status/Blocked
Indicating whether the machine is blocked from operating due to downstream machine(s) conditions.
Starved
None
Boolean
{Machine_ID}/Status/Starved
Indicating whether the machine is starved from operating due to upstream intake conditions.
Stop Reason
None
Integer
{Machine_ID}/Admin/StopReasonCode
Machine Stop Reason Code.
Processed Count
None
Integer
{Machine_ID}/Admin/ProcessedCount
Incremental counter of bottles processed by the machine, either successfully or unsuccessfully.
Defective Count
None
Integer
{Machine_ID}/Admin/DefectiveCount
Incremental counter of bottles processed unsuccessfully by the machine.
Table 3: Machine States Description
StateCurrent Values
Implied Machine State
1
PRODUCING
2
IDLE
3
STARVED
4
BLOCKED
5
CHANGEOVER
6
STOPPED
7
FAULTED
Table 4: Machine Operating Modes
ModeCurrent Values
Implied Machine Mode
1
AUTOMATIC
2
MAINTENANCE
3
MANUAL
We will use Node-RED hosted on an Amazon EC2 instance to create a flow which simulates an OPC-UA server allowing to read the modeled tags mentioned in Table 2: List of modeled OPC-UA tags for each of the machines in the industrial juice bottling line. To quickly setup the Node-RED environment, clone the accompanying AWS CDK infrastructure as code from github.
Clone the application to your local machine.
git clone https://github.com/aws-samples/aws-iot-app-kit-bottling-line-demo.git iot-app-kit-demo
Change to the project directory.
cd iot-app-kit-demo
Install dependencies for the AWS CDK. Note, this is for the infrastructure only.
npm ci
Configure your account and region for CDK deployment
Note: Please use an AWS region where AWS IoT SiteWise is available.
cdk bootstrap aws://<ACCOUNT-NUMBER>/<REGION>
Deploy the cdk stack named OpcuaSimulatorStack. When prompted with “Do you wish to deploy these changes (y/n)?” Enter Y.
cdk deploy OpcuaSimulatorStack
Successful deployment of the OpcuaSimulatorStack should create an OPC-UA server, AWS IoT Greengrass V2 core, a corresponding AWS IoT SiteWise gateway along with asset models and derived assets (representing the machines in the juice bottling line). All of the application components i.e., OPC-UA Server, AWS IoT Greengrass V2 core and AWS IoT SiteWise gateway are deployed in an Ubuntu EC2 Instance created through the OpcuaSimulatorStack.
Deploying the OpcuaSimulatorStack should take a few minutes and will be indicated by the output of the cdk deploy command. In Step 2, we will be building a ReactJS web application to monitor the assets created for the juice bottling line.
Step 2: Build a custom application to visualize the industrial bottling line operation
The cloned code repository aws-iot-app-kit-bottling-line-demo.git contains a starter ReactJS application in the directory named assets/react-app. In this step, we will be adding our AWS IoT App Kit components to the starter ReactJS application in incremental steps.
Change to the ReactJS application directory.
cd assets/react-app
Install required NPM dependencies
npm ci
Create a .env file in the root directory of the react-app i.e., assets/react-app/.env
touch .env
Edit the .env file and add your AWS IAM credentials for programmatic access as environment variables prefixed with REACT_APP_ as shown in the snippet. The value for REACT_APP_AWS_SESSION_TOKEN is only required if you are using short-lived IAM credentials for programmatic access.
REACT_APP_AWS_ACCESS_KEY_ID=<replace-with-aws-access-key-id>
REACT_APP_AWS_SECRET_ACCESS_KEY=<replace-with-aws-access-key>
REACT_APP_AWS_SESSION_TOKEN=<replace-with-aws-session-token>
Save the .env file after editing.
From here, we will begin adding AWS IoT Application Kit components one by one to demonstrate the usage of each component.
Add AWS IoT App Kit NPM packages to ReactJS application dependencies.
npm install @iot-app-kit/components @iot-app-kit/react-components @iot-app-kit/source-iotsitewise
Open and edit src/App.tsx to import installed AWS IoT Application Kit components between the comment lines /* — BEGIN: AWS @iot-app-kit and related imports*/and /* — END: AWS @iot-app-kit and related imports*/ as shown below. Replace the value of awsRegion with the actual AWS region (where OpcuaSimulatorStack was deployed in Step 1).
…
/* — BEGIN: AWS @iot-app-kit and related imports*/
import { initialize } from “@iot-app-kit/source-iotsitewise”;
import { fromEnvReactApp } from “./fromEnv”;
import {
BarChart,
LineChart,
StatusTimeline,
ResourceExplorer,
WebglContext,
StatusGrid,
Kpi,
} from “@iot-app-kit/react-components”;
import { COMPARISON_OPERATOR } from “@synchro-charts/core”;
import “./App.css”;
const { defineCustomElements } = require(“@iot-app-kit/components/loader”);
const { query } = initialize({
awsCredentials: fromEnvReactApp(),
awsRegion: “<replace-with-aws-region>”,
});
defineCustomElements();
/* — END: AWS @iot-app-kit and related imports*/
…
Refer to the AWS IoT SiteWise console to populate the respective asset property ids between the comment lines /* — BEGIN: Asset Id and Asset Property Ids from AWS IoT SiteWise*/ and /* — END: Asset Property Ids from AWS IoT SiteWise*/ that need to be displayed with AWS IoT App Kit
…
/* — BEGIN: Asset Id and Asset Property Ids from AWS IoT SiteWise*/
// Asset Id of the AWS IoT SiteWise asset that you want to display by // default
const DEFAULT_MACHINE_ASSET_ID = ‘<replace-with-sitwise-asset-id>’;
const [ assetId, setAssetId ] = useState(DEFAULT_MACHINE_ASSET_ID);
const [ assetName, setAssetName ] = useState(‘<replace-with-corresponding-sitwise-asset-name>’);
// Asset Property Ids of the AWS IoT SiteWise assets that you want to // query data for
// Refer AWS IoT SiteWise measurements
const OEE_BAD_COUNT_PROPERTY = ‘<replace-with-corresponding-sitwise-asset-property-id>’;
const OEE_TOTAL_COUNT_PROPERTY = ‘<replace-with-corresponding-sitwise-asset-property-id>’;
const CURRENT_SPEED_PROPERTY = ‘<replace-with-corresponding-sitwise-asset-property-id>’;
const MACHINE_STOP_REASON_CODE_PROPERTY = ‘<replace-with-corresponding-sitwise-asset-property-id>’;
// Refer IoT SiteWise transforms
const MACHINE_STATE_ENUM_PROPERTY = ‘<replace-with-corresponding-sitwise-asset-property-id>’;
const MACHINE_MODE_ENUM_PROPERTY = ‘<replace-with-corresponding-sitwise-asset-property-id>’;
const STARVED_INDICATOR_PROPERTY = ‘<replace-with-corresponding-sitwise-asset-property-id>’;
const BLOCKED_INDICATOR_PROPERTY = ‘<replace-with-corresponding-sitwise-asset-property-id>’;
/* — END: Asset Property Ids from AWS IoT SiteWise*/
…
Since we have several assets in our juice bottling line, let us first implement the ResourceExplorer component to allow filtering, sorting, and pagination of our assets. Add the following code between the comment lines {/* — BEGIN: `ResourceExplorer` implementation*/} and {/* — END: `ResourceExplorer` implementation*/} in src/App.tsx
…
{/* — BEGIN: `ResourceExplorer` implementation*/}
<ResourceExplorer
query={query.assetTree.fromRoot()}
onSelectionChange={(event) => {
console.log(“changes asset”, event);
props.setAssetId((event?.detail?.selectedItems?.[0] as any)?.id);
props.setAssetName((event?.detail?.selectedItems?.[0] as any)?.name);
}}
columnDefinitions={columnDefinitions}
/>
{/* — END: `ResourceExplorer` implementation*/}
…
Next, we will implement StatusTimeline component to visualize the Machine State asset property of our various assets. Add the following code between the comment lines {/* — BEGIN: `StatusTimeline` implementation*/} and {/* — END: `StatusTimeline` implementation*/}.
…
{/* — BEGIN: `StatusTimeline` implementation*/}
<div style={{ height: “170px” }}>
<StatusTimeline
viewport={{ duration: ’15m’ }}
annotations={{
y: [
{ color: ‘#1D8102’, comparisonOperator: COMPARISON_OPERATOR.EQUAL, value: ‘PRODUCING’ },
{ color: ‘#0073BB’, comparisonOperator: COMPARISON_OPERATOR.EQUAL, value: ‘IDLE’ },
{ color: ‘#D45200’, comparisonOperator: COMPARISON_OPERATOR.EQUAL, value: ‘STARVED’ },
{ color: ‘#DA4976’, comparisonOperator: COMPARISON_OPERATOR.EQUAL, value: ‘BLOCKED’ },
{ color: ‘#5951D6’, comparisonOperator: COMPARISON_OPERATOR.EQUAL, value: ‘CHANGEOVER’ },
{ color: ‘#455A64’, comparisonOperator: COMPARISON_OPERATOR.EQUAL, value: ‘STOPPED’ },
{ color: ‘#AB1D00’, comparisonOperator: COMPARISON_OPERATOR.EQUAL, value: ‘FAULTED’ }
]
}}
queries={[
query.timeSeriesData({
assets: [{
assetId: props.assetId,
properties: [{
propertyId: props.machineStatePropertyId
}]
}]
})
]}
/>
</div>
{/* — END: `StatusTimeline` implementation*/}
…
Next, we will implement a LineChart component to visualize the following metrics defined in AWS IoT SiteWise for each of the machines in the juice bottling line:
Total Count of bottles processed every 15 minutes
Good Count of bottles processed every 15 minutes
Add the following code between the comment lines {/* — BEGIN: `LineChart` implementation*/} and {/* — END: `LineChart` implementation*/}.
…
{/* — BEGIN: `LineChart` implementation*/}
<div style={{ height: “170px” }}>
<LineChart
viewport={{ duration: “15m” }}
queries={[
query.timeSeriesData({
assets: [
{
assetId: props.assetId,
properties: [
{
propertyId: props.badPartsCountPropertyId,
refId: “bad-parts-count”,
},
{
propertyId: props.totalPartsCountPropertyId,
refId: “total-parts-count”,
},
],
},
],
}),
]}
styleSettings={{
“bad-parts-count”: { color: “#D13212”, name: “Bad Count” },
“total-parts-count”: { color: “#1D8102”, name: “Total Count” },
}}
/>
</div>
{/* — END: `LineChart` implementation*/}
…
Add WebglContext component between the comment lines {/* — BEGIN: `WebglContext` implementation*/} and {/* — END: `WebglContext` implementation*/}.
Note: WebglContext should be declared only once throughout your ReactJS component tree.
…
{/* — BEGIN: `WebglContext` implementation*/}
<WebglContext/>
{/* — END: `WebglContext` implementation*/}
…
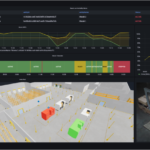
Start a local development server and view the revised ReactJS application by navigating to http://localhost:3000. Once launched, browse through the juice bottling line asset hierarchy and select the asset you want to monitor using the ResourceExplorer component. Upon selecting a particular asset, you can view the Machine State measurements in the displayed StatusTimeline component and Total Count and Good Count metrics in the LineChart components.
npm start
AWS IoT Application Kit also includes components for the following visualization widgets:
BarChart
Kpi
ScatterChart
StatusGrid
The starter ReactJS application also contains sample implementations of BarChart, Kpi and StatusGrid components in the file src/App.tsx. You can refer to AWS IoT Application Kit documentation for details on how to use these components in your ReactJS application.
You can also refer to the sample file src/App.completed.tsx for a completed implementation of AWS IoT Application Kit.
You can also host the ReactJS application built in this walkthrough with AWS Amplify. You can refer to AWS Amplify getting started hands-on guide to get started.
Cleaning up
Delete the created AWS resources setup in this walkthrough by changing directory to the project directory and executing the following stack deletion commands. When prompted with “Are you sure you want to delete: (y/n)?” Enter Y.
cd iot-app-kit-demo
cdk destroy OpcuaSimulatorStack
Conclusion
AWS IoT App Kit provides abstraction, simplicity, and independence in building web applications to meet custom UI/UX requirements. You can learn more by visiting AWS IoT App Kit to get started building real-time IoT web applications to monitor and visualize IoT data from AWS IoT SiteWise.
Leave a Reply
You must be logged in to post a comment.