Are you seeking ways to get an immersive 3D view of your systems and operations to optimize efficiency, increase production, and improve performance? Perhaps you are generating all the data you need from various on-premise systems, but are unsure how to gain access to this information in a living virtual representation. In this blog post, you will learn how to build an end-to-end solution, from Edge to Twin, using AWS IoT TwinMaker. You will also learn how to configure various AWS services to pull telemetry data from an industrial mixer using Open Platform Communications United Architecture (OPC UA) at the edge and build its twin with AWS IoT TwinMaker.
Overview
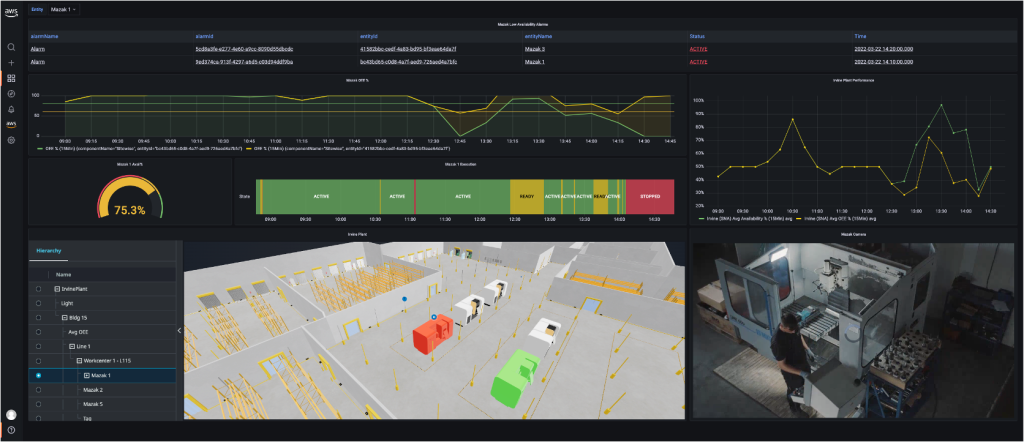
This blog will only work with one data source, but as you acquire multiple streams of data from an industrial environment, AWS IoT TwinMaker can help save time with an automatically generated knowledge graph that binds your data sources. Data sources can range from AWS IoT SiteWise, time series historians, alarming databases, Manufacturing Execution Systems (MES), Enterprise Resource Planning (ERP) systems, and other business systems. Binding these data sources can enable you to create virtual replicas of physical systems to accurately model real-world environments. Over time, your digital twin can grow to adopt Machine Learning (ML) capabilities for anomaly detection and predictive maintenance. The image below is an example of how you can bind various data streams into AWS IoT TwinMaker, including video.
Example manufacturing dashboard for AWS IoT TwinMaker
Scalable Architecture for an Industrial Edge to Twin
This scalable architecture will be created in this blog and will allow you to manage thousands of entities and link their respective data sources
Prerequisites
An AWS account will be required to setup and execute the steps in this blog with real-time simulation. Several services will be configured for the edge which will stream this real-time simulated data through AWS IoT SiteWise to AWS IoT TwinMaker. It is recommended that you work in the Virginia region (us-east-1). You may incur cost on some of the following services:
Setup of OPC UA server on Amazon Elastic Compute Cloud (Amazon EC2) to simulate Mixer data
Setup of AWS IoT SiteWise gateway on AWS IoT Greengrass
Setup of AWS IoT SiteWise Asset Model and Asset for a Mixer
Setup of AWS IoT TwinMaker Workspace, Entities, and Scene
Visualize AWS IoT TwinMaker scene in Amazon Managed Grafana
Running on Amazon EC2 with Ubuntu
Let’s start with the telemetry simulation. For simplicity, you will use an Amazon EC2 instance, but this section may be replaced with your choice for edge computing. On the Amazon EC2 system, you will set up a gateway to ingest data from an asset using a common industrial protocol, OPC UA.
The next task is to log into the instance and install node.js and Node-RED. You will also install an OPC UA server node to simulate data. This is solely for the purpose of simulation. In reality, industrial assets and systems on-premise will likely support OPC UA.
Create the base Amazon EC2 image
Log in to the Amazon EC2 console
Click Launch Instance
Enter the name Edge Gateway
Select the Ubuntu Quickstart
Select the Instance Type – t2.medium
Use an existing Key pair or Create a new key pair and click Download key pair. Your browser will save the .pem file. Keep that safe!
Click the Launch Instance button
After a couple of minutes your Amazon EC2 instance will be running.
Connect to your Instance using an SSH Client by following these steps here
Copy and run the command below to install node red
bash <(curl -sL https://raw.githubusercontent.com/node-red/linux-installers/master/deb/update-nodejs-and-nodered) –confirm-root –confirm-install –skip-pi
Run these commands to install the OPC UA server node
sudo systemctl start nodered.service
sudo npm install –prefix ~/.node-red node-red-contrib-opcua-server &>/dev/null
sudo systemctl restart nodered.service
Now run these final commands to install and run the OPC UA server simulation
curl -O https://iot-blog-files.s3.amazonaws.com/edit-to-twin/opcua_sim.json
curl -vX POST http://127.0.0.1:1880/flows -d @opcua_sim.json –header “Content-Type: application/json”
Server should not be running and can proceed to the next step.
Setup AWS IoT SiteWise Collector on AWS IoT Greengrass
In the next you will setup and install an AWS IoT SiteWise Gateway. This gateway serves as the intermediary between your industrial assets and AWS IoT SiteWise. You can deploy the AWS IoT SiteWise gateway software on any supported platform for AWS IoT Greengrass.
Create an AWS IoT SiteWise Gateway
Navigate to AWS IoT SiteWise
Navigate to Edge->Gateways on the left and click on Create gateway and select Greengrass v2
Select Default Setup and hit Next until you reach add data sources
Click Add data source
Configure the OPC Server as seen below and use opc.tcp://localhost:54845 for the local endpoint of Node Red
Hit Add and then Next
In the section, Review and generate an installer, change the Gateway device OS to Ubuntu and click on Generate
Install the AWS IoT SiteWise Gateway with AWS IoT Greengrass on the Amazon EC2 instance
Copy the installer script to the Amazon EC2 instance. You may use the scp command like below:
scp -i “blog.pem” Gateway-xxxxxxxx.deploy.sh [email protected]:
Run the shell script that was copied
sudo bash ~/Gateway-xxxxxxxx.sh
Your AWS IoT SiteWise Gateway should be in sync within a couple minutes and collecting data. The image below shows data streams captured if the AWS IoT SiteWise gateway is in sync. If you do not see this, you can force the synchronization. To do so, edit the publisher configuration in your AWS ISiteWise Gateway in the console, change the Publishing Order to Newest first to force a change. This will initiate a sync for the Publisher. You can verify that data streams are ingested in the AWS IoT SiteWise Console to proceed.
Setup AWS IoT SiteWise Model and Asset
You have completed the configuration of the Edge node and are now collecting telemetry data from an OPC UA server. This is streamed to AWS IoT SiteWise in the cloud. Next, you will create models and assets and associate these unclaimed streams of data.
Create an Asset Model
Navigate to AWS IoT SiteWise in the AWS Console.
Navigate to Build->Models
Click Create model
For the Name, type Mixer Model
Add 3 measurements:
Name: rpm, Unit: RPM, Data Type: Double
Name: temperature, Unit: Fahrenheit, Data Type: Double
Name: state, Unit: Leave_Blank, Data Type: String
Click Create Model
Create an Asset from the Model and assign data streams
After the model is created, you will see a section for Assets at the bottom of the Mixer Model. Click Create asset
Select the Mixer Model template and provide a name, Mixer_A
Return to the Data Streams section in AWS IoT SiteWise, select the 3 data streams and click on Manage Data Streams
Choose each Measurement on the left and select the corresponding measurement on the right. Then click Choose.
Click Update once complete
Now return to your asset Mixer_A. You can verify that your asset is receiving data by checking the Latest value column
Building your Twin
Now that you have connected to an asset at the Edge and streamed this data into your AWS IoT SiteWise data source, you can now use AWS IoT TwinMaker to build your twin. Keep in mind, AWS IoT SiteWise is not a requirement for AWS IoT TwinMaker. Sources of telemetry data may come from other systems. For this blog, you are specifically handling telemetry data but an industrial twin is expected to be comprised of several data sources.
Create a workspace
Navigate to AWS IoT TwinMaker
Click Create workspace
Provide a name MixerWorkspace
Select to create a new S3 bucket
Select to Auto-generate a new role, then click Skip to review and create
Click Create Workspace
Create an Entity
Navigate to Workspaces → Entities
Click Create Entity
Provide the name Mixers
Click on the entity your created and create a child entity
Provide the name Mixer_A. When building out a twin for a facility, you may create a hierarchy that is representative of your physical layout or process.
Select the Mixer_A entity and click to Add component
Provide the name SiteWise and select the type com.amazon.iotsitewise.connector
Once the type is selected, you will see that you can select the asset model and asset that you configured in AWS IoT SiteWise. Just select the Mixer Model and Mixer_A asset. That’s it! The data is now linked.
Scroll down and click Add component. See expected results below
Add a Resource
Download this CAD model from our Cookie Factory demo for a mixer.
Navigate to Workspace→Resource library
Click Add resource
Chose the GLB model file you downloaded. You will use this later when creating the Scene for this mixer.
Add a Scene
Navigate to Workspace→Scenes
Provide a Scene name Mixers and create the scene
Within the scene editor, click on plus “+” sign to add a 3D model
Rename the model from CookieFactoryMixer to Mixer_A
Click the plus sign again and select Add light. Feel free to adjust angle of the light and intensity
Select Mixer_A from the left and click the plus sign to select Add model shader
On the right, select Mixer_A for the entity_id, SiteWise for the ComponentName, State for the PropertyName, and sampleTimeSeriesColorRule for the Rule Id
Select the Rules tab
Select the existing rule sampleTimeSeriesColorRule
Change the 3 expressions as seen below and adjust colors to your preference. Proceed to visualize this scene in Grafana
Visualize your Twin in Grafana
AWS IoT TwinMaker supports Grafana integration through an application plugin. The AWS IoT TwinMaker plugin provides custom panels, dashboard templates, and a data source to connect to your digital twin.
Setup Managed Grafana Workspace
Navigate to Amazon Managed Grafana
Complete the Getting Started guide to setup a workspace with SSO authentication
Use this inline policy (inline_policy.json) to provide Grafana with permission to call APIs for AWS IoT SiteWise, AWS IoT TwinMaker, and Amazon S3. Replace the {account id} with your AWS account id and the Universally Unique Identifier (UUID) for both the Asset Model and Asset in Sitewise
Setup AWS IoT TwinMaker Data source in Grafana
Click on the workspace Grafana URL
In Grafana, setup your data source
Click Add data source
Select AWS IoT TwinMaker
Select the MixerWorkspace click Save & test
Create an AWS IoT TwinMaker dashboard
Create a new dashboard in Grafana.
In a new Panel, select AWS IoT TwinMaker Scene Viewer
Select the Scene Mixers
In order to animate the shading of colors configured in the scene rules, you will need to add a query for the mixer state property value history as shown below. Animations will not work without this step
That’s it! Feel free to create other panels to view data trends
Note: In Grafana, you can take advantage of creating Variables in order to allow the dynamic switching between Entities you select within the dashboard.
Clean Up
Be sure to clean up the work in this blog to avoid charges. Delete the following resources when finished in this order
AWS Managed Grafana Workspace
AWS IoT TwinMaker Scene, Resources, Entities, and Workspace
AWS IoT SiteWise Gateway, Asset, and Asset Model
AWS IoT Greengrass Core device under menu Greengrass→Core devices
Core Device Thing in AWS IoT Core under the menu Manage->Things
Terminate the Amazon EC2 Instance
Conclusion
In this blog, you worked from Edge to Twin, creating a connection to an OPC UA server to collect industrial data through AWS IoT SiteWise on AWS IoT Greengrass. You streamed this data to AWS IoT SiteWise in the cloud and accessed this data from AWS IoT TwinMaker to create a Twin entity of your mixer that you later visualized in Amazon Managed Grafana. This was a simplified walkthrough to connect one entity and data tag. In common practice, this can be scaled out to thousands of entities and data sources allowing you to access streams of data ingested for telemetry, video, machine learning inference results for predictive maintenance, manufacturing execution data, and more. As your Digital Twin grows in capability, you can begin to marry data between various business systems giving your operations insights into your production performance, utilization, and quality of product.
AWS IoT TwinMaker is now generally available. To learn more about AWS IoT TwinMaker, visit some of the websites below for more details:
https://aws.amazon.com/iot-twinmaker
https://aws.amazon.com/blogs/aws/aws-iot-twinmaker-is-now-generally-available/
About the author
Chris Azer is a Senior IoT Specialist Architect helping customers with their digital twin initiatives. Chris has worked in various roles at AWS since 2017 supporting partners and customers with architecting IoT solutions. This includes a broad set of use cases covering the DoD, Manufacturing, State and Local Government, Federal and Civilian, Smart Cities, Partners, and others. His career in Industrial Automation dates back to 2004 where he continues to assist enterprises today with their smart manufacturing journey.
Leave a Reply
You must be logged in to post a comment.