Introduction
In this post, we will be discussing how to manage Docker container lifecycle using an AWS IoT Greengrass custom component. There are five phases in a Docker container lifecycle: create, run, pause/unpause, stop, and kill. The custom component interacts with the Docker Engine via the Docker SDK for Python to manage processes based on your use case, such as user initiated commands or an application sending commands.
AWS IoT Greengrass is an open source Internet of Things (IoT) edge runtime and cloud service that helps you build, deploy and manage IoT applications on your devices. You can use AWS IoT Greengrass to build edge applications using pre-built software modules, called components, that can connect your edge devices to AWS services or third-party services.
AWS IoT Greengrass components can represent applications, runtime installers, libraries, or any code that you would run on a device. You can configure AWS IoT Greengrass components to run a Docker container from images stored in the following locations:
Public and private image repositories in Amazon Elastic Container Registry (Amazon ECR)
Public Docker Hub repository
Public Docker Trusted Registry
Amazon S3 bucket
While Greengrass components have lifecycles of their own that you may interact with, these lifecycles do not support containerized processes. To start, stop, pause and resume a Docker container running on AWS IoT Greengrass, you can use commands such as Docker pause and Docker unpause via a Greengrass component running on a Greengrass core device. The custom lifecycle component, which we will refer to as the ‘lifecycle component’, consists of a Python script that subscribes to an AWS IoT Core MQTT topic and interacts with the Docker Engine.
Solution Overview
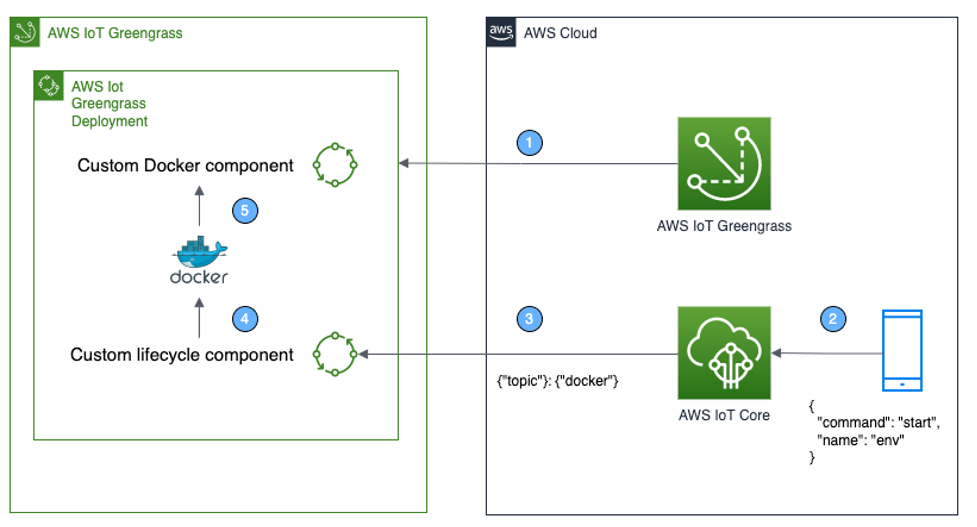
Below is an example workflow and architecture for one possible implementation. With these building blocks in hand you can further expand to fit your specific use case.
A user deploys a Docker container component and the lifecycle component to the Greengrass core device.
The application publishes a MQTT message to an AWS IoT Core topic. The MQTT message specifies the container name and desired action to be performed. In this example, we send a start command to the container named env.
The custom lifecycle component is subscribed to the topic.
The lifecycle component receives the message and then interacts with the Docker Engine via the Docker SDK for Python and executes the desired command on the container name specified.
Based on the command received from the lifecycle component, the Docker Engine will pause, unpause, start, or stop the specified container.
Solution Diagram
Implementation Instructions
Prerequisites
The AWS CLI is installed and configured.
AWS Greengrass Core installed on your device.
Docker Engine is installed and running.
Deploy a Docker container to a Greengrass Core device
Follow the instructions on how to run a Docker container with AWS Greengrass or optionally create and run a container with the Docker Engine itself. Be sure to provide a name for the container, in this example we use the name of env.
Verify you have a running Docker container and that it has the desired name:
docker container ls
Create the custom lifecycle component
To create a Greengrass component we need to create the Python script that will contain our code and also a Greengrass recipe which will specify the deployment details when the component is deployed to a Greengrass Core device.
Create an empty folder and script file named customlifecycle.py. mkdir -p ~/artifacts && touch ~/artifacts/customlifecycle.py
In your favorite Integrated Development Environment (IDE), open customlifecycle.py and paste the following code. Be sure to save the file. Note: the code snippet below is under an MIT-0 license and is available on Github. #Imports
import time
import json
import traceback
import docker
import subprocess
import awsiot.greengrasscoreipc
import awsiot.greengrasscoreipc.client as client
from awsiot.greengrasscoreipc.model import (
IoTCoreMessage,
QOS,
SubscribeToIoTCoreRequest
)
TIMEOUT = 10
ipc_client = awsiot.greengrasscoreipc.connect()
topic = “docker”
qos = QOS.AT_MOST_ONCE
#IPC Stream Handler
class StreamHandler(client.SubscribeToIoTCoreStreamHandler):
def __init__(self):
super().__init__()
def on_stream_event(self, event: IoTCoreMessage) -> None:
message = json.loads(event.message.payload.decode())
try:
client = docker.from_env()
name = message[“name”]
command = message[“command”]
if command == “start”:
container = client.containers.get(name)
container.start()
print(“Starting container: ” + name)
elif command == “pause”:
container = client.containers.get(name)
result = json.loads(container.pause())
print(result)
print(“Pausing container: ” + name)
elif command == “unpause”:
container = client.containers.get(name)
print(container.unpause())
print(“Unpausing container: ” + name)
elif command == “stop”:
container = client.containers.get(name)
container.stop()
print(“Stopping container: ” + name)
else:
print(“Error”)
except:
with tempfile.TemporaryFile() as tmp:
tmp.write(“Docker Error”)
def on_stream_error(self, error: Exception) -> bool:
message_string = “Error!”
return True
def on_stream_closed(self) -> None:
pass
#Initiate Subscription
request = SubscribeToIoTCoreRequest()
request.topic_name = topic
request.qos = qos
handler = StreamHandler()
operation = ipc_client.new_subscribe_to_iot_core(handler)
future = operation.activate(request)
future_response = operation.get_response()
future_response.result(TIMEOUT)
while True:
time.sleep(1)
operation.close()
Create a bucket and retrieve your bucket name using the following command. EPOCH_TIME=$(date +”%s”) && S3_BUCKET=lifecycle-component-$EPOCH_TIME && aws s3 mb s3://$S3_BUCKET
Execute the following command to create a folder and a file to put the recipe into. mkdir -p ~/recipes && touch ~/recipes/customlifecycle-1.0.0.json
Open the created recipe file customlifecycle-1.0.0.json and paste the following contents. Replace [YOUR BUCKET NAME] with the bucket name retrieved in the step 3. {
“RecipeFormatVersion”: “2020-01-25”,
“ComponentName”: “Docker-lifecycle-component”,
“ComponentVersion”: “1.0.0”,
“ComponentType”: “aws.greengrass.generic”,
“ComponentDescription”: “A component that interacts with Docker daemon.”,
“ComponentPublisher”: “Amazon”,
“ComponentConfiguration”: {
“DefaultConfiguration”: {
“accessControl”: {
“aws.greengrass.ipc.mqttproxy”: {
“docker_lifecycle:mqttproxy:1”: {
“policyDescription”: “Allows access to subscribe to all topics.”,
“operations”: [
“aws.greengrass#SubscribeToIoTCore”
],
“resources”: [
“*”
]
}
}
}
}
},
“Manifests”: [
{
“Lifecycle”: {
“Install”: “pip3 install awsiotsdk”,
“Run”: “python3 -u {artifacts:path}/customlifecycle.py”
},
“Artifacts”: [
{
“Uri”: “s3://[YOUR BUCKET NAME]/customlifecycle.py”
}
]
}
]
}
Upload the component artifacts to Amazon Simple Storage Service. aws s3 cp –recursive ~/artifacts/ s3://$S3_BUCKET/
Next, we will publish the Greengrass component by running the following command. cd ~/recipes && aws greengrassv2 create-component-version –inline-recipe fileb://customlifecycle-1.0.0.json
You can now see this has been added to your AWS IoT Console -> Greengrass -> Components -> My Components.
Deploy the custom lifecycle component
Now we will deploy the custom lifecycle component to your Greengrass Core device using the AWS CLI. Deployments may be applied to Things or Thing Groups. In this case, we will apply the deployment directly to the Greengrass Core thing entity.
Create a deployment manifest folder and file using the command below. mkdir -p ~/deployments && touch ~/deployments/gg_deployment.json
In your IDE, copy and paste the below into the gg_deployment.json file. Update the [targetARN] with your Thing ARN. You may retrieve your Thing ARN from the AWS IoT Core console. Be sure to save the file. {
“targetArn”: “[targetArn]”,
“deploymentName”: “Deployment for Custom Docker Lifecycle”,
“components”: {
“Docker-lifecycle-component”: {
“componentVersion”: “1.0.0”
}
}
}
Create the deployment with the following command. cd ~/deployments && aws greengrassv2 create-deployment –cli-input-json file://gg_deployment.json
Verify that the component is now running on your Greengrass Core device. It may take several minutes for it to instantiate. sudo /greengrass/v2/bin/greengrass-cli component list
Test the Custom Lifecycle component
Go to AWS IoT Core console, select the MQTT test client.
Select Publish to topic.
In the Topic name, enter docker
In the Message payload, copy in the message below. The command syntax will depend on the name and current state of your container. {
“command”:”start”,
“name”:”env”
}
Verify that the state of your container has changed. docker container ls
Conclusion
In this blog post, we explored how to use AWS IoT Greengrass to control a Docker container’s lifecycle. This was achieved using a custom component that subscribes to an AWS IoT Core MQTT topic and uses the message contents to execute commands against the Docker daemon with the Docker SDK for Python.
To take a deeper dive with AWS IoT Greengrass, including building Greengrass components, check out our AWS IoT Greengrass V2 Workshop!
Leave a Reply
You must be logged in to post a comment.